Badges (quick status badges) are the little icons that appear at the bottom of the lock screen. They exist to tell you something about your computer at a glance without having to log in – for instance how many emails are unread whether your battery needs charging and so on. Some badges just appear on the lock screen not matter what you do. For example if you have an internet connection a badge appears on the lock screen.. If you’re using a tablet or laptop the battery status appears; there’s nothing you can do about it.
Mostly, though, Windows 10 lets you pick and choose quick status badges that are you important to you. You may ask “why can’t I just choose them all?”. The programs that support the badges update their information periodically — every 15 minutes, in some cases. If you have a badge on your lock screen the lock screen app that controls the badge has to wake up every so often so it can retrieve the data and put it on the lock screen. Putting everything on the lock screen drains your computer’s battery.
Corollary: if your computer has a short battery life whittle your badge needs as much as possible, get rid of any quick status badges you don’t absolutely need. But if your computer is plugged in to the wall put all the badges you like on the lock screen.
Here’s how to select quick status badges:
- Click or tap Start and then the settings Icon.
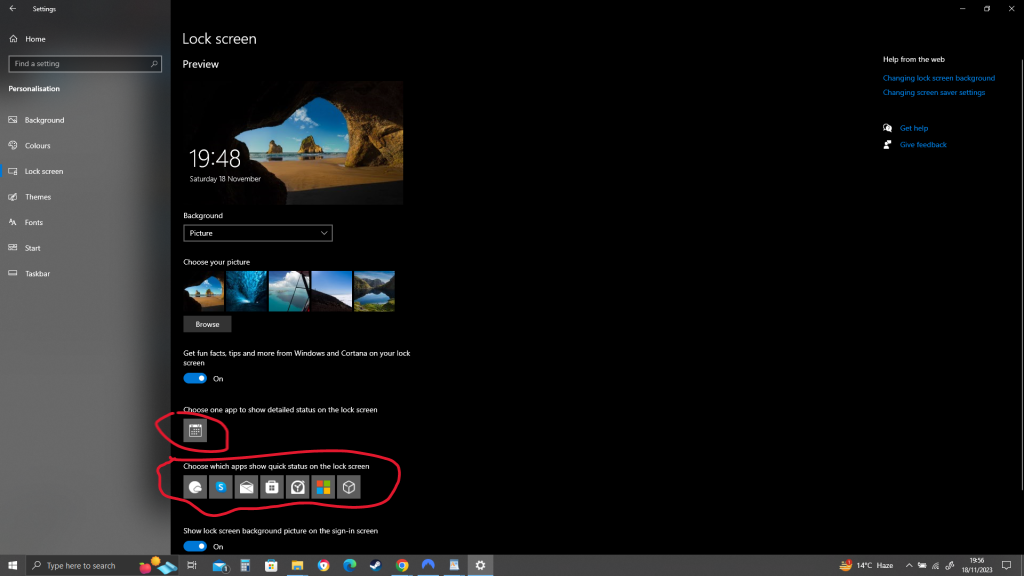
- Choose personalisation. On the left, choose Lock Screen and on the right scroll down. At the bottom of the Lock screen settings are two rows of grey icons the first of which contains one icon only, you can see them in the screenshot below. The first Icon points to a specially anointed app that shows detailed status information on the lock screen, you only get one. I have the calendar which is the default choice. The detailed status app has to be specially designed to display the large block of information shown in the lock screen.
- Tap or click the detailed status icon and choose which display badge you want to appear as a detailed status quick status badge in that slot on the lock screen. Apps must specially designed to display the badge information on the lock screen. You’re given a choice of all the apps that have registered with Windows 10 as being capable of of displaying a quick status badge on the lock screen. As you add more apps some of them appear spontaneously in this section. The second row of seven icons corresponds to seven badge locations at the bottom of the lock screen. They appear in order from left to right starting below the time. In theory, you can choose which badges appear where they appear in order from left to right.
- Click each of the seven grey icons in turn and choose an app to show its status on the lock screen. If you choose None, the grey icons gets a plus (+) sign indicating that it isn’t being used. No badge appears in the corresponding slot on the lock screen.
Quick status apps have to be built specifically to show their badges work on the lock screen. Once you’ve selected them you’re done there’s no apply or Ok button.
Go back out to the Lock Screen — click or tap the start Icon, choose your profile picture at the top, choose Lock — and see whether you like the quick status badge changes on the Lock screen. I you don’t like what you see or you’re worried about your battery draining unnecessarily then start again with step 1.
Conclusion
That wraps up the article on how to add quick status badges/icons to your lock screen, quick status badges and icons can be handy to give you essential information at a glance in regards to your system.